Showing posts with label tutorial. Show all posts

Monday, January 16, 2023

5+ Videos for Kids on How to Draw Martin Luther King Jr.


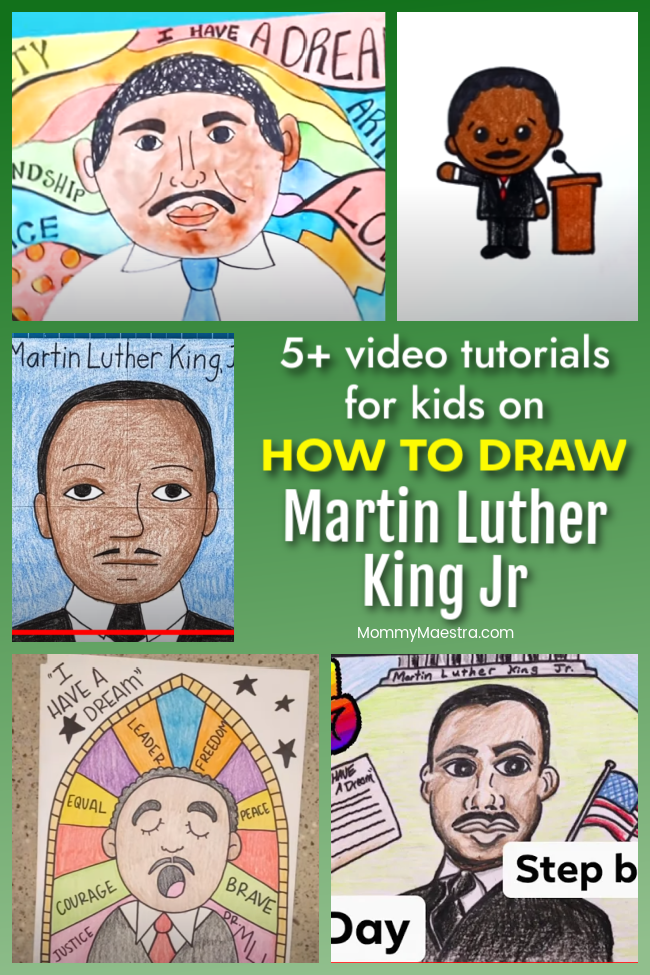
In honor of MLK Day, I decided to share with you some really great video tutorials for kids on how to draw Dr. Martin Luther King, Jr.. Art is always a fun way to learn about historical figures, especially if you can't make a trip to the library for biographies or don't have any other resources to study someone. Below are several videos for drawing the famous civil rights activist. And I tried to include ones for different ages and skill levels.

This post contains affiliate links.

Gather Your Art Supplies


Before you get started, first decide on the video tutorial you'll be using. Then go ahead and get all your art supplies together. Here are some of the supplies used in the following art lessons.


How to Draw Martin Luther King Jr. Videos


Art for Kids Hub is one of my favorite drawing-for-kids channels. They have this video tutorial for How To Draw Cartoon Martin Luther King Jr.:


BONUS! You may also enjoy their drawing lesson for How To Draw I Have A Dream:


I love Making Art with Ms. B's directed drawing video because it's a different presentation of Dr. King - SO creative!


Art Projects for Kids has this simple and fabulous video lesson for drawing Dr. King:


Older students may enjoy this How to Draw Martin Luther King EASY - Step by Step for KIDS w/ Background from Mr. Schuette 's - ART CLASS:


And I really love this easy tutorial from Deep Space Sparkle that uses sharpie markers and watercolors for making a Martin Luther King Jr. Portrait:


Thursday, September 15, 2022

How to Draw Like Picasso


As I was working on activities for Hispanic Heritage Month, I researched artists. I was thinking about Cubism and how to draw like Pablo Picasso, so I decided to look up some video lessons for kids and found a fantastic collection of videos that you may enjoy. Some of them include a short biography on Picasso at the beginning of the video, but not all of them. I hope that you'll find one (or more!) of these tutorials easy to follow and inspirational. You can learn more about the artists if you visit my post on Pablo Picasso Lesson Plans, Activities, Coloring Pages, and More.

This post contains affiliate links.

Gather Your Art Supplies

Before you get started, first decide on the video tutorial you'll be using. Then go ahead and get all your art supplies together. Here are some of the supplies used in the following art lessons.


How to Create a Picasso/Cubist Face


We'll start with this lesson for K - 5 from Meghan Bergman (be sure to check out her Picasso card game, too)


Mr. Schuette 's - ART CLASS has this simple art lesson for younger children.


I Love Drawing has this mini-lesson on CUBISM FOR KIDS!


Art Fun with Vanessa Lombardo shows you how to draw two different types of faces. I like how she uses different supplies to color in the faces.


Rainbow Parrot Art has this great tutorial on Cubist Portraits. I think it is better suited for older children.


She also has this excellent Picasso Portrait Lesson for Beginners.


Tutorials for Unique Cubist Art


If you'd like to get away from human faces and would like to try something different, check out this one from Admire Design.


Or if you don't like drawing at all, maybe this cardboard Cubist face tutorial from Ms. Pomranky's Art Room is more to your liking!


And this one from Art with Ms. Steratore is awesome, too. It features Picasso's Blue Guitar...


Here's Part 2 and Part 3

Cubism Tutorials for Digital Drawings


The one is a Cubism/Picasso-inspired portrait using illustration software or app, such as Procreate.


Monday, August 8, 2022

10+ Videos on How to Draw Frida Kahlo


I was sitting and thinking about fun activities to kick off the first day of school, and started just browsing through my notes. The one that leapt out at me was the topic, How to Draw Frida Kahlo. I stumbled through some absolutely wonderful how-to videos for this earlier this summer while researching Frida activities. There were so many that it was hard for me to choose just one - which I featured in my master post, Frida Kahlo Lesson Plans, Activities, Coloring Sheets and More

So I made a note to just go ahead and write a post sharing a variety of the best video tutorials for drawing the legendary Mexican artist. I tried to choose videos with different styles so that you had a nice selection to choose from... or do them all!

I hope you enjoy these. And if you are interested in other Frida-related crafts, check out my post Frida Kahlo Crafts for Kids. You'll be sure to be inspired!

This post contains affiliate links.

Gather Your Art Supplies


Before you get started, first decide on the video tutorial you'll be using. Then go ahead and get all your art supplies together. Here are some of the supplies used in the following art lessons.


How to Draw Frida Kahlo Videos


The first ones come from Ms. Jess Art Class. She actually has two fabulous video tutorials.


The next one is for K-2nd and comes from Morgan Mays


The next one was uploaded by StudioUs Chicago. I love how Rachel talks us through all the steps.


I also enjoyed this video by Draw with Gufo


Art with Ms. Naomi has this delightful video.


If you'd like to use different media, maybe this lesson plan for a minimalist style that uses watercolors will appeal to you. It's nicely done by Susan Crilley Creative Crafts for Kids 


Mrs. Lauren Wynn also uses a combination of drawing tools, including crayons, markers, pencils, and more.


doodleacademy has this quick time-lapse video of a simple watercolor painting. I really like the style of this one.


And finally, here's a painting how-to from Paint with Lovejoy. You can download the traceable by watching the video on YT and clicking the link in the description below her video.


BONUS Frida-Inspired How to Draw Videos


For something a little different, check out this tutorial from Ms. Bakker's Art Room for drawing Frida's spider monkey!


Or you may enjoy this super fun one from Ms. G's Studio


Other Posts You May Enjoy:


Wednesday, April 27, 2022

DĂ­a Craft: Make Your Own Family Keepsake Book


This week, we continue our series on DĂ­a inspired crafts. These are literacy-based crafts that kids can put together. And these are fun activities that promote a reading culture at home. Today's craft comes from guest contributor and artist Denise Cortes, who originally wrote this for L4LL. If you enjoy this tutorial, check out her other one: DIY Book-Inspired Sports ID Tag.

We hope your children enjoy this tutorial for making their own DIY family keepsake. 

This post contains affiliate links.

Día de los Niños Craft: Bookmaking


My kids are really sentimental when it comes to family photos. One of our favorite things to do as a family is to thumb through their baby books and photo albums. We all laugh at the memories and by the end, I’m usually in tears. Why must childhood be so fleeting?

I wanted to teach my daughters how to make a DIY family keepsake book so they could collect photos, small notes and drawings, keeping alive the tradition of documenting our family.

This craft project is inexpensive and fun for everyone! 

Materials:


Directions:

What I love most about this project is we’re repurposing an inexpensive brown paper bag. It’s as simple as folding a bag or two in half, sandwiching them together, poking a few holes on one side and threading a piece of twine or ribbon to bind them together. After trimming one side with a pair of decorative edge scissors, you will have a “book” with pockets, similar to an accordion.


If you want to make the “book” thicker, use more than one paper bag. I used two, which allow me to have four pockets for sliding in photos and keepsakes.


To bind the paper bags together, make three holes along the edge that is opposite to the opening side.


Now you are ready to decorate your book. Find a few patterned sheets of scrapbooking squares. Cut them down to size so they can fit properly.


Glue down each piece of scrapbooking paper onto the “pages” of your book. Add a smaller piece of solid color paper and glue it on top of the scrapbooking paper, toward the bottom. This space is for any captions such as: My Family, Mama, Papa, Brother, Sister, Abuelita, etc. Remember, you are celebrating family!


The final step is to thread the book with a piece of jute twine, to bind all of the pages together. Be sure to tie a tight knot.


Now you can fill up your keepsake book with pictures, notes, and photo booth pictures!


Friday, April 22, 2022

DĂ­a Craft: Music-Themed Magazine Holder


Here is another fun craft that nurtures a reading culture in your home. Today's tutorial comes from guest contributor Dariela Cruz of MamiTalks, who originally wrote this for L4LL. 

Magazine holders are so useful. I never think of them for the kids’ room, but even if the kids don’t have any magazines, they always have coloring books, reading workbooks, math workbooks, or notebooks that can definitely be organized better inside a magazine rack.

This post contains affiliate links.

Día de los Niños Craft: Themed Magazine Holder


This magazine rack is made out of a cereal box, some scrapbooking paper, and stickers. It is very easy to make and the kids can help, too. 

This one has a musical theme and can be very useful for storing sheet music and/or music notebooks. But let your child choose the theme that appeals to them the most. There are many wonderful designs of scrapbooking paper available for each kid’s preference. 

Guide them through this craft and they will love making something useful for their own room!


Supplies:


Instructions:


Grab the empty box of cereal and place a magazine on top of it.

Make marks with the permanent marker on one side of the box a little bit higher than the magazine height and on the other side make a mark a little bit lower than the half of the magazine’s total height.


Draw a line joining both marks then continue on the other side with the help of a ruler.


Carefully cut the box with scissors (or with a craft knife) along the marked lines.


The structure of the magazine holder is done. Now to decorate it!


Use the first scrapbooking paper and lay the box on top of it. NOTE: it will cover only two sides of the box. 

With a pencil mark the paper leaving space for flaps on every side and the top and bottom, they don't need to be precise, just make sure you have them all, then cut along your marks with scissors.


Once the paper is cut, apply the glue with a brush to all its areas.


Glue the paper around the two sides of the box.

Mark, cut, and glue the second scrapbooking paper the same way as the first but don’t leave flaps on 2 sides so that the border of the paper is exactly aligned with the edge of the box.


Once the whole magazine holder is wrapped with paper, apply the decoupage glue all over it and let it dry for a couple of hours.


Cut a small rectangle of scrapbooking paper and place it on the inside of the back of the magazine holder. This part will show even when the magazines are inside.

OPTIONAL: You may want to cover all of the inner sides and spine.


Now, it’s time for the fun part! 

Let the kids use the stickers and have fun decorating the magazine holder! Use them on the thin sides of the holder, which are the ones that will show more often when it’s in use.


Books that Celebrate Music:


Other Posts You May Enjoy:


Monday, April 18, 2022

DĂ­a Craft: DIY Book-Inspired Sports ID Tag


DĂ­a de los niños, DĂ­a de los libros is quickly approaching. And one of the requests we've received from our readers is for more DĂ­a inspired crafts. So that will be the focus of our next several posts. Today's craft comes from guest contributor and artist Denise Cortes, who originally wrote this for L4LL. 

DĂ­a is about celebrating children and books, as well as inspiring literacy. We hope you enjoy this tutorial for a DIY book-inspired sports ID tag. Be sure to scroll down for a list of sports-themed picture books that your children may also love!

This post contains affiliate links.

Día de los Niños Craft Idea


With this cool ID tag on your soccer (or baseball or football) bag, you can easily spot it amongst your teammates’. It also showcases your love of reading and soccer (or whatever sport you play).


Materials:


- scissors
- hole punch
- loose leaf binder ring (we also like these binder rings for a splash of color)
- cardboard
- scrapbooking paper 
- black marker


Directions:


Whenever I am crafting, I really try to utilize my resources. Instead of going out and buying a thick piece of cardstock, I used a piece of cardboard. I just cut it down to the size I wanted my ID tag, which was 3 x 3 inches. 

I also cut a circle so I could make a soccer ball shape. On the white paper, draw a soccer ball, making sure its the same size as the cardboard circle. Color it in with the Sharpie marker and then cut it out.


Glue the soccer ball drawing onto the round cardboard shape. Also, glue the blue scrapbooking paper onto the cardboard as well. 

You can use a glue stick, but for this particular project, I prefer Mod Podge. Not only will it glue my shapes together, it will seal the surface and make the ID tag a bit more sturdy. 

This means you’ll need a coat under your paper to glue it down to the surface as well as a coat brushed on top to act as a sealer. Once that coat is dry, you can add little details on your “book” with a black marker.


My son’s team was called “The Transformers” and the team color was blue, so I kept to a blue palette. I also cut out a few triangles to give it a fun, modern look. Glue them down with another coat of Mod Podge. Doodling a few fun designs would look great on your ID tag, too.


Once it’s completely dry, make a hole in the corner of each shape using the hole punch. Pull the shapes onto the loose leaf binder ring.

Be sure to flip the ID tag over and write down your information, just in case your bag gets lost. Your book-inspired sports ID tag is now ready to be displayed on a sports bag or backpack! 


Sports-Themed Books for DĂ­a


We recommend these picture books for sports lovers:


And be sure to check out this book written especially for celebrating DĂ­a!


Book Fiesta! by Pat Mora

Other Posts You May Enjoy


Wednesday, April 29, 2020

DĂ­a Craft: DIY Book Tutorial

The following tutorial is contributed by Lisa Renata. It originally ran on the Latin Baby Book Club.

Reading is a daily thing in our home, as is recycling and creating. So when I was asked if I could put a tutorial together on how to create your own bilingual book, I was ecstatic. I then gathered the materials (and kids) needed to start our project. This is what we came up with.


Nothing fancy. It is made by children after all, but isn't that what makes it that much more special? The older the child gets the more intricate the work, details, and writing will be.

Make Your Book:


Creating a book is a lot easier than it looks. It is also a perfect and a fun way for your little one to practice reading in both languages (or one).


What you'll need:


• an empty cereal box
• 5 sheets of white printer paper
• sewing machine and thread (other options available)
• markers, crayons, colored pencils
• stamps and ink

Steps:


First, cut out the larger part of your cereal box. This will be your book cover.


Then use it as a template to size and crop your 5 sheets of white paper. You want the white paper to be slightly smaller than the cover.


Fold your cover and paper (at the same time) in half. Then if you have a clip available, clip one of the ends together. This will help hold all the sheets and cover in place while you sew a line across the center. Use the fold line as your guide.

If you don't have a sewing machine other options to bind your book can be: stapling the center together, or hole-punch about four holes on the edge of the fold and then run ribbon or yarn through the holes. Make sure to knot the ends.


Write Your Story:


Now it is time to write your story! What to write? Well, that will depend on the age of your child and what their interests are at the time. In our case, my five-year-old son is really into animals right now. So we decided to make a book about animals.


First, I wrote out the title and by-line page.

Because he is still learning to read in both English and Spanish, I decided to do the writing for him. I wrote simple three-word sentences. I chose black ink for the words in Spanish and blue ink for those in English.


Then he drew a picture that went along with each sentence.


For my three-year-old daughter, I wrote one word per page, both in English and in Spanish (also using different colors per language) and drew the pictures for her. All she had to do was color them in.

Once the inside of the book was completed, we then decorated the cover with stamps. How much supervision you need with each child will also depend on their age. I allowed my son free range on how he wanted his front cover decorated, but my daughter, on the other hand, needed my help.

Again, the older your child is the more detailed his/her book will be and the less involved you will be in the book-making process (in fact, if your child can sew, you can let him/her bind the book). If your child does not know what to write about, give him/her some topic ideas. The important thing is to encourage creativity in both their writing and art.

Book cover finished? Then you are done!


Have fun together reading your child's creation over and over again!

-------------------------------


Lisa Renata is a US-born Latina who experienced Mexican culture first-hand when she lived there as a child. Lisa is a book lover, a mama raising her two kids bilingual, and a crafter.. with a camera always in her hands. You can often find her interpreting and testing for the local school district ESOL program or making new items for her Etsy shop SaborCajeta.

Monday, September 19, 2016

How to Host a Children's Hispanic Heritage Month Party

The following is a guest post by the remarkable Frances Evans from Discovering the World Through My Son's Eyes.


This post contains affiliate links. 

Hispanic Heritage Month is by far our favorite month of the year. It always runs from September 15 through October 15. 

Although it initially started as a Hispanic Heritage Week under President Lyndon B. Johnson back in 1968, it wasn't until 1988 that President Ronald Reagan extended it to a month-long celebration. 

¡Enhorabuena! 

Across the nation you'll find many events celebrating Hispanic Heritage Month. During these 30 days we recognize the contributions of Hispanic Americans and celebrate our heritage and culture.

Nevertheless, there are many areas and schools that don't celebrate this month. I live in small, Southern town and guess what? No one knows about HHM! I've taken it upon myself to educate others, especially young minds.  Educating children and adults alike, helps break barriers and exposes them to a culture unbeknownst to them.

Whether you live in an area where celebrating this month is huge, or you live in a small community that doesn't; you can always plan to host your very own Children's Hispanic Heritage Month Party!

This is my second year partnering up with our local library! 

How to Prepare for your Children's Hispanic Heritage Month Party


First, you have some decisions to make. Do you want to: 
  1. host a party in your child's classroom
  2. simply invite your child's friends over to your house, or 
  3. do you want to go above and beyond and host a party for your community

I've actually done all three! For the first one, you'd need to coordinate with your child's teacher. To throw a party in our community, I presented my idea to the director of our local library, and this is my second year hosting!

The ideas below can be adjusted to fit your needs.  This is simply an outline of ideas and suggestions:  
  • Where and who is the party for? School, home, or community? 
  • Decide on a date and time between September 15 and October 15.
  • Make a list of the food you want to serve. Simple Hispanic finger foods are best. Possible dishes include:   

    • Fresh fruit sprinkled with TajĂ­n. 
    • Spread refried beans and crumble queso fresco over a tostada (corn tortilla). 
    • Empanadas (you can buy these at a Hispanic bodega). 
    • Guacamole and salsa with chips (these are a hit!) 
    • Churros (you can buy these at a taquerĂ­a). 
    • Taco bar with all the fixings. 
    • Variety of Mexican breads such as conchas, cocoles, novias, or puerquitos (you can buy these at a Mexican panaderĂ­a "bakery store"). 
    • Beverages you can purchase: some Goya brand juice such as mango, maracuya (parcha/passion fruit) and many other flavors. 


  • Games 
    • Guess the name of a Hispanic country's flag. This is fun because there are some flags that look alike! 
    • LoterĂ­a is a traditional game! Much better than your regular bingo cards. 
    • Role-play with the Hispanics in History Character Crowns or have a parade! 
If you need more Hispanic Heritage Month resources, you can find them right here on MommyMaestra. I hope you have fun planning and hosting your Children's Hispanic Heritage Month celebration.  

Let's get this party started! ¡A celebrar el Mes de la Herencia Hispana! 


Other Posts You May Enjoy


--------------------------------------------------------------------

Frances is a part-time blogger, mommy and wife of a beautiful multicultural familia. Shortly before her child turned 4 years old, she started blogging about discovering the world through her son's eyes, hence the name of her blog. She loves doing things with him, and became passionate about teaching him to be bilingual and to identify with his multicultural identity. She writes about heritage, bilingualism, multicultural children's book, and global culture education with lots of hands-on activities and language learning ideas for kids. 
She can be found musing at her blog Discovering the World Through My Son's Eyes or on Instagram, her new fave social media platform. 

LinkWithin

Related Posts Plugin for WordPress, Blogger...